Saturday, March 30, 2013

Chenille Bunny Eggs

Thanks to Rachel and Sarah I am ready (I think) for Easter.  We spent most of the day yesterday cleaning, cooking and crafting.  The girls wanted to made a video, so we saved one of these eggs to make on video but didn't realize how out of view we were. So we will have to try another time.  I saw these cute Bunny Eggs HERE and knew I wanted to make them for this year's table favors.  We filled them with jelly beans!


Unfortunately, the only chenille stems I had were green but that didn't stop us!  Thank you Denise for sending up the little pom poms for the tails!  I think they worked out great.  In the picture, I turned the end bunnies around so you could see the tails! The only thing we did different was Sarah wanted to put eyes on - bunnies have to see where to hide the eggs!

With left over chenille Sarah decided to make a stick man.


Well, hopefully the weather will hold out until after we have our egg hunt tomorrow.  Everyone at the Pansy Patch would like to wish you and your families a "Happy Easter".

Nancy     Rachel    Sarah


Thursday, March 28, 2013

Easter Bunny Treat Bags

Every year I make these cute bunny treat bags.  They come together so quick and easy and the kids love them - as well as the adults!


I usually match up the paper with the different color peeps that I find.  This year was Pretty in Pink, Wisteria Wonder and Daffodil Delight.  I used my Top Note Bigz Die and then scored it in half.  The eyes were made using the 1" and 3/4" circle punches and the ears were made with the oval punches.  I glued the ears on the back of the top note and my sentiment on the front of my 4" x 6" clear bag.  I used the Happy Easter from SU's Teeny Tiny Wishes.  I put some green grass on the inside along with two little peeps and stapled the top note over the bag to close it.  I covered up the staples in the front with my bunny's eyes.  I then used my gel pen to make some eyes and whiskers.  They disappeared pretty fast  - these are all I have left for Easter day.

Spent most of the day shopping and cooking.  Rachel and Sarah are coming up tomorrow to help out and make some table favors.  I hard boiled 3 dozen eggs to color as well, so we will have plenty to keep us busy!  Have a great weekend!

Thanks for stopping bye,
Nancy, Rachel & Sarah


Tuesday, March 26, 2013

Blossom Flower Treat Bags

This week is moving along much too fast!  Sarah was up over the weekend and wanted to make some treat bags for her teachers for Easter.  I had some leftover Blossom Flowers so this is what we came up with.


We just put them in  4"x6" clear bags.  I always seal my bags with the tiny plastic hair ties that you can purchased in CVS.  This way I don't have to stuggle putting the tag on.  She used my Framelit from SU for the tag and my Teeny Tiny wishes Happy Easter stamp from SU for the sentiment.  We tied it around the top of the bag with 1/8" ribbon and we were done. 

I also had some pillow boxes left over over as well.


These come together so quickly.  I don't have the die from SU but you can buy various sizes at Michael's in different colors.  I used a background stamp to give the pouch some definition and tied some ribbon around one end.  I used my "Happy Easter" stamp from Michael's and cut it out with a Spellbinders die.  You can put anything you want inside.  We used the rest of our Blossom Flowers.

Hope you are having a good week.  One more day and the girls are off from school!!!  Yea!! Rachel has to go back though on Monday to make up a snow day - she's not too happy about that!

Thanks for stopping bye,
Nancy, Rachel & Sarah


Sunday, March 24, 2013

Easter Goodie Tray

This weekend I finished up a tray for my daughter to take to the Wellness Center this week.  I've made these little flowers the past few years and they are always a big hit!


Supplies:

Stamps - Mixed Bunch - SU
Ink - Summer Sun, Melon Mambo, Wisteria Wonder - SU
Paper - Whisper White, Garden Green - SU
Punches - Modern Label, Blossom - SU
Candy - Rolo's - Easter Package

These cute flowers are so easy to make and come together quickly.  Stamp the flower on the Whisper White CS with the ink of choice and then punch it out with the coordinating punch.  Then I use the Modern Label punch for the leaves in Garden Green.  I  cut them in half and using mini glue dots I adhere the two pieces on the back of the flower to form the leaves.  I then adhere the Rollo candy with a glue dot in the center of the flower and you're done! I found a cute watering can and put the rabbit inside for the fun of it!

It's hard to believe that Easter is next weekend, and we are expecting more snow again tonight into tomorrow!  The girls are hoping for no school!  I always have Easter dinner and the Easter Egg Hunt so it will be a busy week!

Thanks for stopping bye,
Nancy, Rachel & Sarah


Monday, March 18, 2013

Sarah's Birthday Card

Sarah had her family birthday party this weekend in between the snow!  She turned 11 years old and this is the first time we can remember having snow.  She'll have her girlfriends over for a sleepover this weekend - LOL!!  Here is the card I made for her.  She has always loved pinwheels since she was a little girl, so I knew what type of card I would make her!


Supplies:

Stamps - Just for You - Michael's
Paper - Brilliant Blue, Whisper White - SU, K&Company - Watercolor Bouquet
Accessories - Pinwheel Sizzlits - SU, Cricut Cartridge - George & Basic Shapes
Embellishments -  Mini brad, lollipop stick - Michael's

This is an A2 sized card - 5 1/2" x 4 1/4" in Brilliant Blue. The next layer is 5 1/4" x 4" in the double sided Watercolor Bouquet.  My circles were cut 3 1/4" and 3".  I adhered my circles to my layer and then my pinwheel to my lollipop stick.  I stamped my sentiment and then freehand cut the edges.

What is a birthday without a cake!  One guess who Sarah wanted on her cake?


Katie Perry of course!  We had a good time in spite of the snow! 

 
Well, it's snowing AGAIN!  I thought Spring was on its way!  Hopefully, we won't get too much!  Hope you have a great week - without snow!

Happy Birthday Sarah!!!
 
Thanks for stopping bye,
Nancy, Rachel & Sarah


Thursday, March 14, 2013

St. Patrick's Day Card

I always feel that St. Patrick's Day is somewhat a forgotten holiday.  Stuck inbetween Valentine's Day and Easter it can get neglected!  We love this holiday and go all out to celebrate it.  Here is one of the cards I made to send to friends and family.  I saw this done on several blogs and love how it looked.


Supplies:

Stamps - Teeny Tiny Wishes, Happy St. Patrick's - SU
Paper - Old Olive, Whisper White, DSP - SU
Ink - Old Olive - SU
Accessories - Full Heart, Large Oval and Scallop Punch - SU, Gem

The card is an A2 size - 5 1/2" x 4 1/4" in Old Olive.  The layer is 4" x 5 1/4" in Whisper White.  I punched out 3 hearts in Old Olive and 3 hearts in the DSP of your choice.  I adhered the 3 hearts in Old Olive to my layer to form my shamrock.  I then cut a small stem by hand and adhered it to the center of the shamrock leading down to where my sentiment will be.  I scored the 3 DSP hearts in half and adhered them down over the other hearts just in the fold so they would give a 3D look which I think made this card.  Then I stamped my sentiment and punched it out and placed it on the scalloped punch.  I then popped it up on the bottom of my card hiding the end of the stem.

It was so windy here today!  We have a busy weekend.  The family is celebrating Sarah's birthday Sat.  Hard to believe she will be 11 years old.  Then on Sunday we are all going to a St. Patrick's Day Brunch with green eggs and ham!  Gotta love it!  Hope you all have a great weekend whatever your plans are and a wonderful St, Patrick's Day!

Thanks for stopping bye,
Nancy, Rachel & Sarah

Monday, March 11, 2013

St. Patrick's Day Basket of Goodies

I had some goodies left over from my last tray I had made up, so I decided to put together a quick basket for my daughter to take to the hospital for her co-workers to enjoy.


All I did was line the basket with some green doilies and tie a green bow on the handle.  I stamped some whisper white paper with the Happy St. Patrick's stamp from SU and punched it out with the large scalloped from SU.

I then made up some quick goodie bags for the girls to hand out to their teachers.


Supplies:

Paper - Whisper White, Garden Green - SU
Stamps - Happy St. Patrick's - SU
Accessories - Top Note Die - SU, plastic bags

I scored the Top Note die in half - lengthwise - and then stamped my sentiment on it.  I used up the rest of my goodies from my other projects this week putting them in a  4x6" plastic bag.  I stapled the Top Note on either side and covered up the staple with some left-over shamrocks and they were done!

It's hard to believe that I'm starting to decorate for Easter.  These holidays are just going bye way too fast!  Hope you have a great week!

Thanks for stoppping bye,
Nancy, Rachel & Sarah


Friday, March 8, 2013

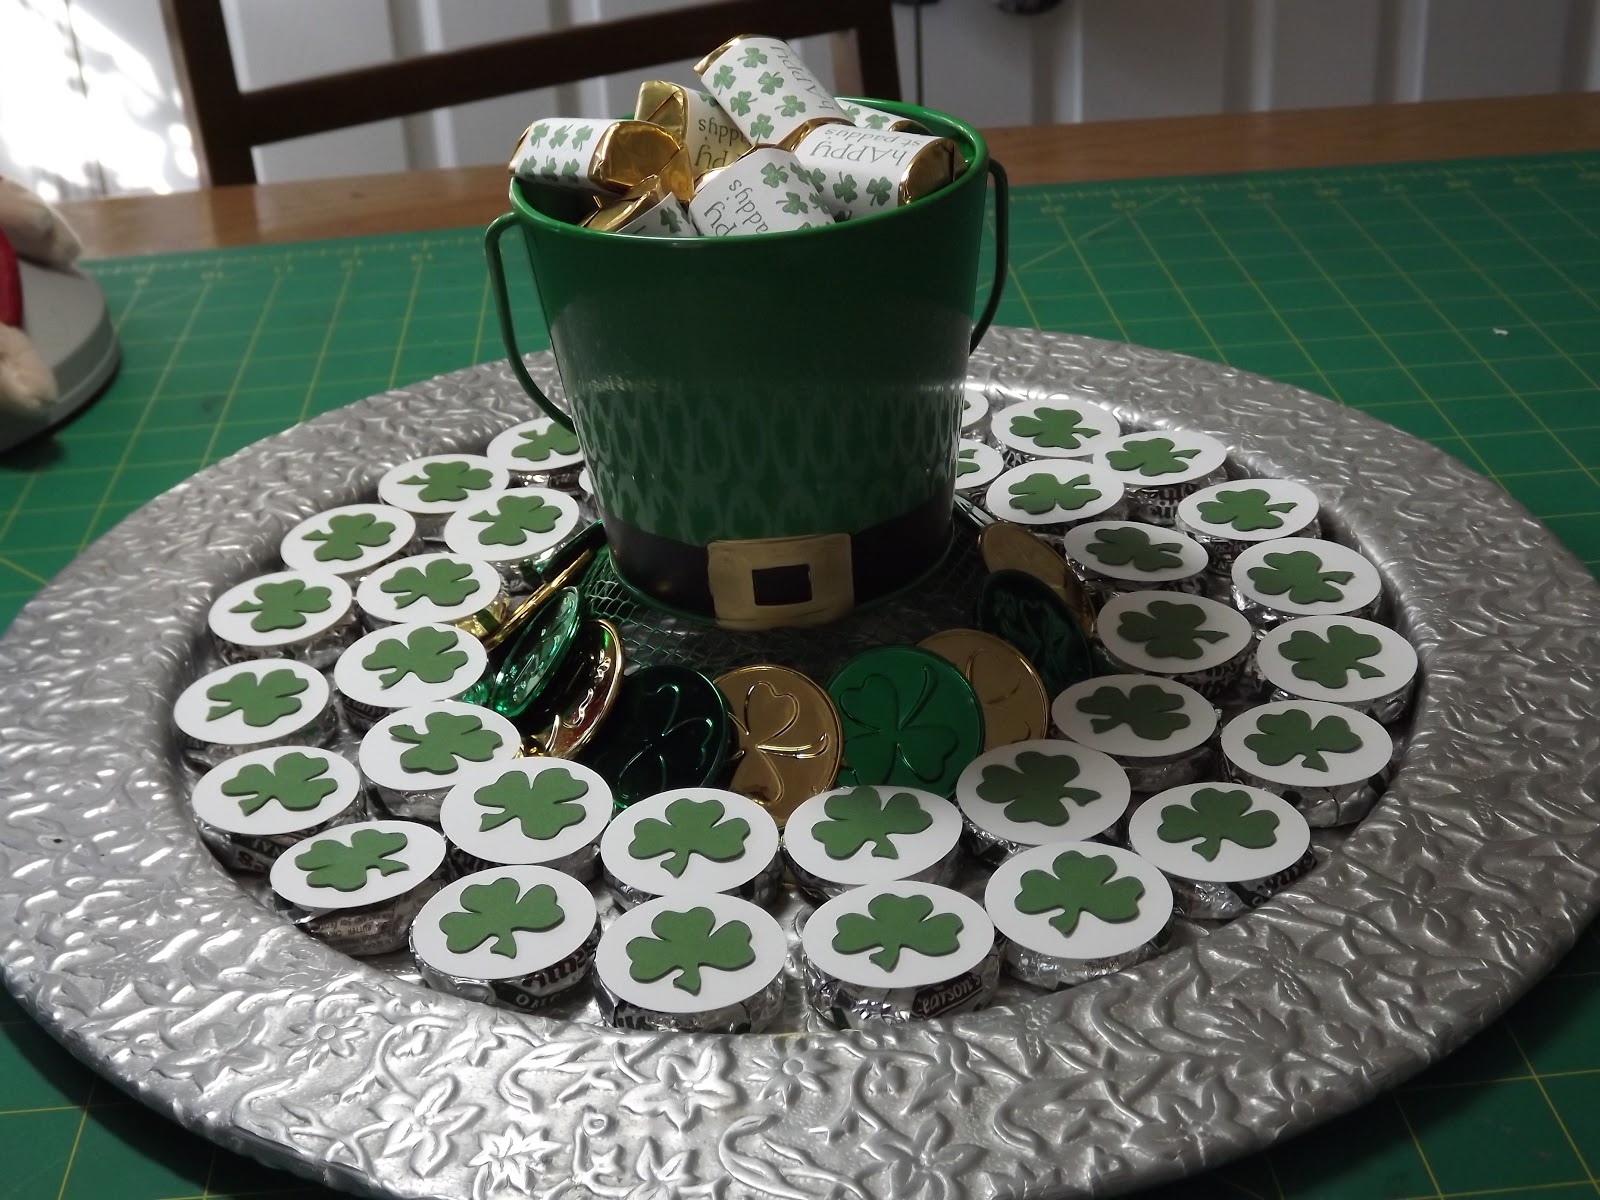
St. Patrick's Day Goodies

Here is another tray of goodies that I just finished for my daughter to take to the group at the Wellness Center to help celebrate St. Patrick's Day!


Supplies:

Stamps - It's a Wrap Holidays - SU
Ink - Garden Green
Paper - Whisper White, Garden Green - SU
Accessories - Circle Punch - 1 3/8, Cricut Cartridge - Paper Dolls Dress Up - Pg. 40

I usually use York's Peppermint Patties but they started wrapping them in square papers, so I looked around and found another brand called Pearson's.  They worked out great!  I had to taste them for quality, of course, and they were yummy!  They were easy to assemble and $1 cheaper a bag!

I cut my shamrocks out at 1 inch and put them on my punched white circle with a mini glue dot, and then I used a larger glue dot to adhere that to the pattie.  Make sure that you adhere it on the flat side.  I then added some nuggets to my container that I decorated with my labels which I had stamped with the St. Patrick's Day stamp.  I also put in some plastic "good luck" coins that I picked up at Michael's for some added decoration.

I hope everyone survived this nasty week!  We were spared alot of snow but still got heavy winds and terrible weather! We woke up this AM to about 2 inches of snow and it is still snowing!   Have a great weekend - and hurry Spring!!

Thanks for stopping bye,
Nancy, Rachel & Sarah

Sunday, March 3, 2013

St. Patrick's Day Good Luck Treat

I thought I would show you one of the items I'm making for my daughter to take to work for St.Patrick's Day.  I saw this stamp at a Stamp Show and fell in love with it.  It's made by Toomuchfun.  I purchased a few of their stamps that day and have used this one alot.


Supplies:

Stamps - Toomuch fun, Good Luck Stamp
Ink - Black Stazon
Paper - Brushed Gold - SU
Accessories - Scissors

I was able to stamp several of these treats on one piece of paper.  I found out the hard way that you have to give the ink more time to dry than normal before cutting them out. I think it's because of the texture of the brushed gold paper.  After cutting them out, I stamped my good luck in the circle.  I can't remember where I got this stamp from.  It's a clear stamp which makes it easy to place.  Place your little treat inside.  I usually put  a chocolate wrapped gold coin, and then fold it up like a box and you're done!

Well, they say March comes in like a lion and goes out like a lamb!  They are forcasting a snowstorm for midweek, but I'm hoping they're wrong!  Hope you have a great week!

Thanks for stopping bye,
Nancy, Rachel & Sarah