Saturday, April 20, 2024

Carrot Treat Boxes

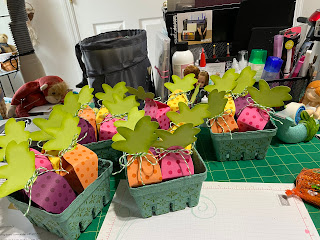
 This year for Eastern I decided to give the kids something a little different than the regular Easter Baskets.  We always have the egg hunt here but by the time they get here they have already received their baskets filled with goodies.  I saw these cute baskets over at Taylor Expressions and decided to make some.


I made five of them but forgot to take a final picture, so I snapped these on their way home.  


Here they are almost finished waiting for the little rabbit to be glued on. I glued the carrot top on, filled them with goodies and tied them together with some twine.


I used the Take Two stencil from Taylor Expressions.  It is one sheet with two different stencils.  I just cut it in half and used one on the berry baskets and one on the carrots.  The die for the carrots is called Carrot Treat Box.  I decided to add a little bunny and put a google eye and glue a puff ball on for the tail with the Impression Obsession Die and put a wobble on it so it wiggled around.  I love how they turned out.  

Thanks for stopping by,


Nancy


Saturday, April 6, 2024

Foiled Easter Cards

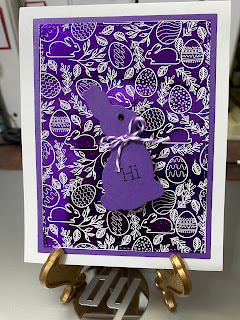
Well, I hope everyone had a blessed Easter.  This year it came so early it was a rush to get everything done.  Since I had my foiling machine set up I decided to make some more cards with the poly-glaze sheets I had purchased from Gina K.  They had little bunnies and eggs on them which I thought were so cute!  I concentrated on using two foil colors - purple and gold.  


These were made with the purple foil layered on a piece of SU's Gorgeous Grape CS.  The dark purple card was made with the negative piece of foil.  Absolutely no waste which I love.


I decided to use an old bunny die I had and mount it on a wobble to make it wiggle and some twine to dress them up. 

The sentiment is from SU's Easter Bunny stamp set. An oldie but goodie! The next three cards are made with the gold foil.


It was hard to take a picture of the negative gold card but I loved how it turned out layered on a piece of SU's Gold Brushed CS.


I used the same sentiment stamp but in gold ink and the bunny was in the gold CS as well.


I was so pleased with my first attempt with foiling.  I will definitely have to watch some more videos and see what other techniques I can do with the foiling.  The family was here for the day and we enjoyed watching Jennifer and Juan looking for eggs.  I'm sure everyone read about the earthquake we had yesterday.  We were in the kitchen eating breakfast and the house started to shake.  Everything was rattling but fortunately nothing broke.  It took us a minute to realize what was happening as we don't get many earthquakes here.  I started to call the family to check on them as Jennifer's house is only a few miles from the epic center.  They were shook up but all was well.  Margaret was at the hospital where she works on the 5th floor and the building started swaying a bit.  Checked with Rachel and Sarah and they felt it too but were OK.  We had a few after shocks later in the day but nothing like in the morning.  This tremor was definitely not like what's happening in Taiwan.  We were lucky.

I entered this post over at - NBUS Challenge #61 and Four Seasons April 2024 - Anything Goes Spring.

Thanks for stopping by,


Nancy


Sunday, March 24, 2024

Birthday Card for Sarah

 I have been thinking for awhile about getting into foiling but had been putting it off until Gina K designed her own foiling machine called the Fuse.  She made it so tempting with all the extra goodies that came along with it and of course the first offering the machine was PURPLE!!  I couldn't resist anymore, so out came the gift cards I had received for Christmas.


I started playing around with it yesterday and came up with this card for Sarah's birthday.  The base card is white with a layer of SU's Raspberry bliss.  The main focal layer is what they call a Poly-Glaze sheet.  I received so many different ones plus foils in the package, so I decided to use this one for her birthday card.  One thing I like about foiling is after you foil one of these sheets you can use the negative sheet on a piece of toner paper and foil for a second run.  For this card, I decided to use the first foil because you couldn't see the sentiment that well on the negative piece with everything colored.  I could have also colored/blended  the design but decided not to because of the same reason.  It is hard to tell on the picture, but there is a beautiful sparkling shine from the foil I used.  The Happy Birthday is a die from SU.


The inside sentiment is from the SU stamp set Happy Birthday Gorgeous.  There are so many different things one can do with this system.  I am working on some Easter cards so we will see how it goes.

Thanks for stopping by,


Nancy

Wednesday, March 13, 2024

St. Patrick's Day Cards

 It is hard to believe that March is almost half over!  It was a beautiful day in PA with temps in the high 60's!  We traveled to Lancaster and had a wonderful lunch with friends that are moving to Tennessee.  The weather was perfect for a drive in the country.  I always make cards for this holiday and this year is no exception.


These were made with the stamp set/die from an older kit that I had purchased from Gina K a few years ago.  I used it that year to make this card. 


I used SU's Old Olive CS for my base card with and Basic White for my layer.  


For my inside sentiment, I used one of my old wood stamps that I have had for years!  I loved how these cards turned out.

I entered this post over at - Double D Challenges.


Thanks for stopping by,


Nancy

Tuesday, March 5, 2024

Congratulations Card for Jennifer

 Jennifer has done so well in school again this year, so I decided to make a card for her and send with some $$$ for getting on the Honor Roll again


Looking through my stash. I found some Gold Glimmer CS from SU which I used for my base card.  I used the Fireworks Stencil from Hedgehog Hollow with my Encore Gold Ink from SU.  I decided to use SU's Botanicals for You in black and wondered if I should have stamped it first but decided to go with it and stamped over the gold.  It's hard to see but the gold ink actually came through the black ink and looks pretty neat.  I then put some star gems on the fireworks.  


For my inside sentiment, I used the same SU stamp set and stenciled a smaller fireworks in the corner.  I really liked how this turned out and of course Jennifer liked what was included inside!! LOL!

Thanks for stopping by,


Nancy

Wednesday, February 28, 2024

Gift Bags for Valentine's Day

 I almost forgot to post these adorable gift bags that I made and put in the goodie bags for the kids for Valentine's Day.


These came out so cute!  These smaller bags are made especially for gift cards!


The dies are from Concord & 9th.  The set also has a larger bag that will fit an A2 card which I'm sure I will be using in the future.  I used some left over Valentine DSP scraps I had on hand.  The dies have different handles you can use along with a stamp set of sentiments. Notice the pansy candy that Rachel and I found at the Vermont Country Store.  All their candy is yummy!!

Thanks for stopping by,


Nancy


Wednesday, February 21, 2024

Red Heart Valentine's Day Card

 Today's post is the last Valentine Card I made.  This is another die set that I saw Jennifer McGuire demonstrate.  It was a new release also from Concord & 9th.  I think they really did a fantastic job on this release.  I always wonder how they come up with all these great stamp sets and dies!


This set is call the Enchanted heart dies.  I used some of the other smaller hearts on previous cards.  


I used white CS for my CB and SU's Real Red CS for my layer.  I used Gina K's Love die and cut it out in Gold paper.  I used one of these cards for Joe's Valentine.


For my inside sentiment, I used SU's stamp set Heart to Heart again and glued some of the negative hearts from the front die. Our friend sent us a similar card but instead of red CS she used glimmer paper and it was gorgeous!  I'm happy to say that our weather is supposed to warm up the next few weeks so goodbye snow!!

Thanks for stopping by,


Nancy

Tuesday, February 13, 2024

Kids Valentine's Cards

 Well, tomorrow is Valentine's Day.  We  hope everyone has a wonderful day filled with fun and surprises!  I made these two cards for Jennifer and Juan.  I saw Jennifer McGuire do a video with the new Concord & 9th Pop Heart Turnaround stamps and dies and decided to try it out!


I have one other turnaround stamp set and after watching her video I decided to get the jig that they made to help you with the technique.  It was definitely a game changer.  I used dye ink and craft ink and was pleased with the result.


I took her advice and cut 4 white layers for the words to make them stand out and then used the white craft dye ink to stamp on the letters.  I think it made such a difference.


For my inside sentiment, I used SU's Heart to Heart stamps.  When  I was stamping my card front I used a 6" x 6" CS and then cut it down to an A2 size which left me nice pieces to use on the inside.


Here is the card that I made for Jennifer using the same technique.


We  got 10" of snow yesterday but thankfully the temperature is warm today and half of it is gone!  If course Joe's truck with the plow decided not to run so he had to use the snow blower which is too small for the job which is why we got the plow a few years ago!  Always something!!  The rest of the week is suppose to be warmer, so hopefully it will all be gone sooner than later.

Thanks for stopping by,


Nancy


Wednesday, February 7, 2024

Valentine Heart card

 I'm trying to get all the cards made for Valentine's Day and of course time is running it.  These are some of the cards I have been working on.


I saw this technique on Jennifer's McGuire blog and thought it was so unique.  I used SU's Heart Embossing folder on my Real Red CS, layered it on my base card of white and then used Concord & 9th Enchanted Die set to cut out the heart.  


Using the different dies, I cut one out in pink CS with the sentiment and mounted it on red CS to make the lettering show through.  My sentiment came from an old SU stamp set Heart to Heart.  


It was hard to get a good picture of the shelf that I made for the heart die to rest on so when you opened up the card it popped right out!  This idea can be used with so many different size/shape dies.  She did a great video on how to made this happen.  It really was so easy!  Hope you are having a good week!  It is really nice here, so Joe and I are on our to NJ to see Jennifer's basketball game.

I will be entering this post over at - Can You Handle the Pressure Challenge

Thanks for stopping by,


Nancy


Sunday, January 28, 2024

Heart Valentine Day Card

 Well, we have had more nasty weather here, so I decided to start making some cards for Valentine Day.  Last year, I purchased a kit from Gina K called Luck and Love.  I made a St. Patrick's Day card with some of it but never used the Layering Heart stencils that were included.  I decided to play around with them and loved how they turned out.  Gina made a birthday card with the stamps that came in the kit - Frame Flora - so I decided to make them for Valentine Day.  


I used her Master Layout #1 to cut my layers and her Masking Magic 1/8" stripes to make a border before I did my stenciling.


I popped up some of the flowers and leaves over the sentiment strip which came from SU's Heart to Heart stamp set.


My inside sentiment was also from the same stamp set.  I didn't want to waste my extra leaves I had die cut, so added them as well along with some heart washi tape I had in my stash.  I was so happy how this card turned out!

Entered this post over at Double D Challenge.

Thanks for stopping by,


Nancy


Thursday, January 18, 2024

Little Monkey Card

 Well, winter is definitely upon us!!  It is freezing here with snow from the last storm still on the ground, and more to come tomorrow.  While watching the snow fall the other day, I decided to make a fun card to have in my stash. 


I used a SU stamp set with matching punch.  My base layer is Chocolate Brown with my second layer in Very Vanilla.  I stamped the branch first and then layer some DSP from the Flowers and More pack.  I ended up fussy cutting the top monkey as the punch is only good for the one on the bottom and the bananas.  The greeting is also from the stamp set and I found some old gems that I thought would match.


For my inside, I used some more of the DSP and added some bananas.  Quick card except for the fussy cutting!  Pinterest has some cute ideas for these little monkeys, so I will be trying them soon.  

Thanks for stopping by,


Nancy


Tuesday, January 9, 2024

Rudolph Christmas Card

 I almost forgot to post the Christmas cards I made for Jennifer and JJ.  I was looking in Pinterest for something to make for them and came across this adorable card.


I used SU's Real Red CS for my base card and then used Simon Says Filigree Snow Folder to emboss my second layer.  


For my Rudolph, I used a die set from Simon Says called Reindeer Parts.  It's hard to see, but I used some lacquer on his noise to make it nice and shiny!  I also tied a tiny jingle bell with some twine on his antlers.  


 For my sentiments, I used the same stamp set.  I think they turned out so cute!  We had about 8" of snow over the weekend but most of that will disappear with today's warm weather, rain and wind!  Ugh!! Hope all those in severe weather are safe and warm!

I entered this post over at the - Can You Handle the Pressure Challenge.

Thanks for stopping by,


Nancy