Tuesday, December 22, 2020

Snowglobe Christmas Shaker/ Easel Cards

 I finally got around to finishing up the girls Christmas cards this weekend and wrapping presents!  Nothing like getting things done under the wire!  I fell in love with this cute die that Heartfelt Creations released last month.  There are so many things you can make with it.  I decided to make it into shaker cards for Rachel and Sarah.  Shaker cards are one of my favorite things to make.  These were made using Heartfelt Creations DSP and matching dies.  This was one of the first collection I purchased last year.


Aren't these little penguins adorable!  I love them!  I used some DSP for the inside of the shaker cards and decorated the outside with all the goodies!


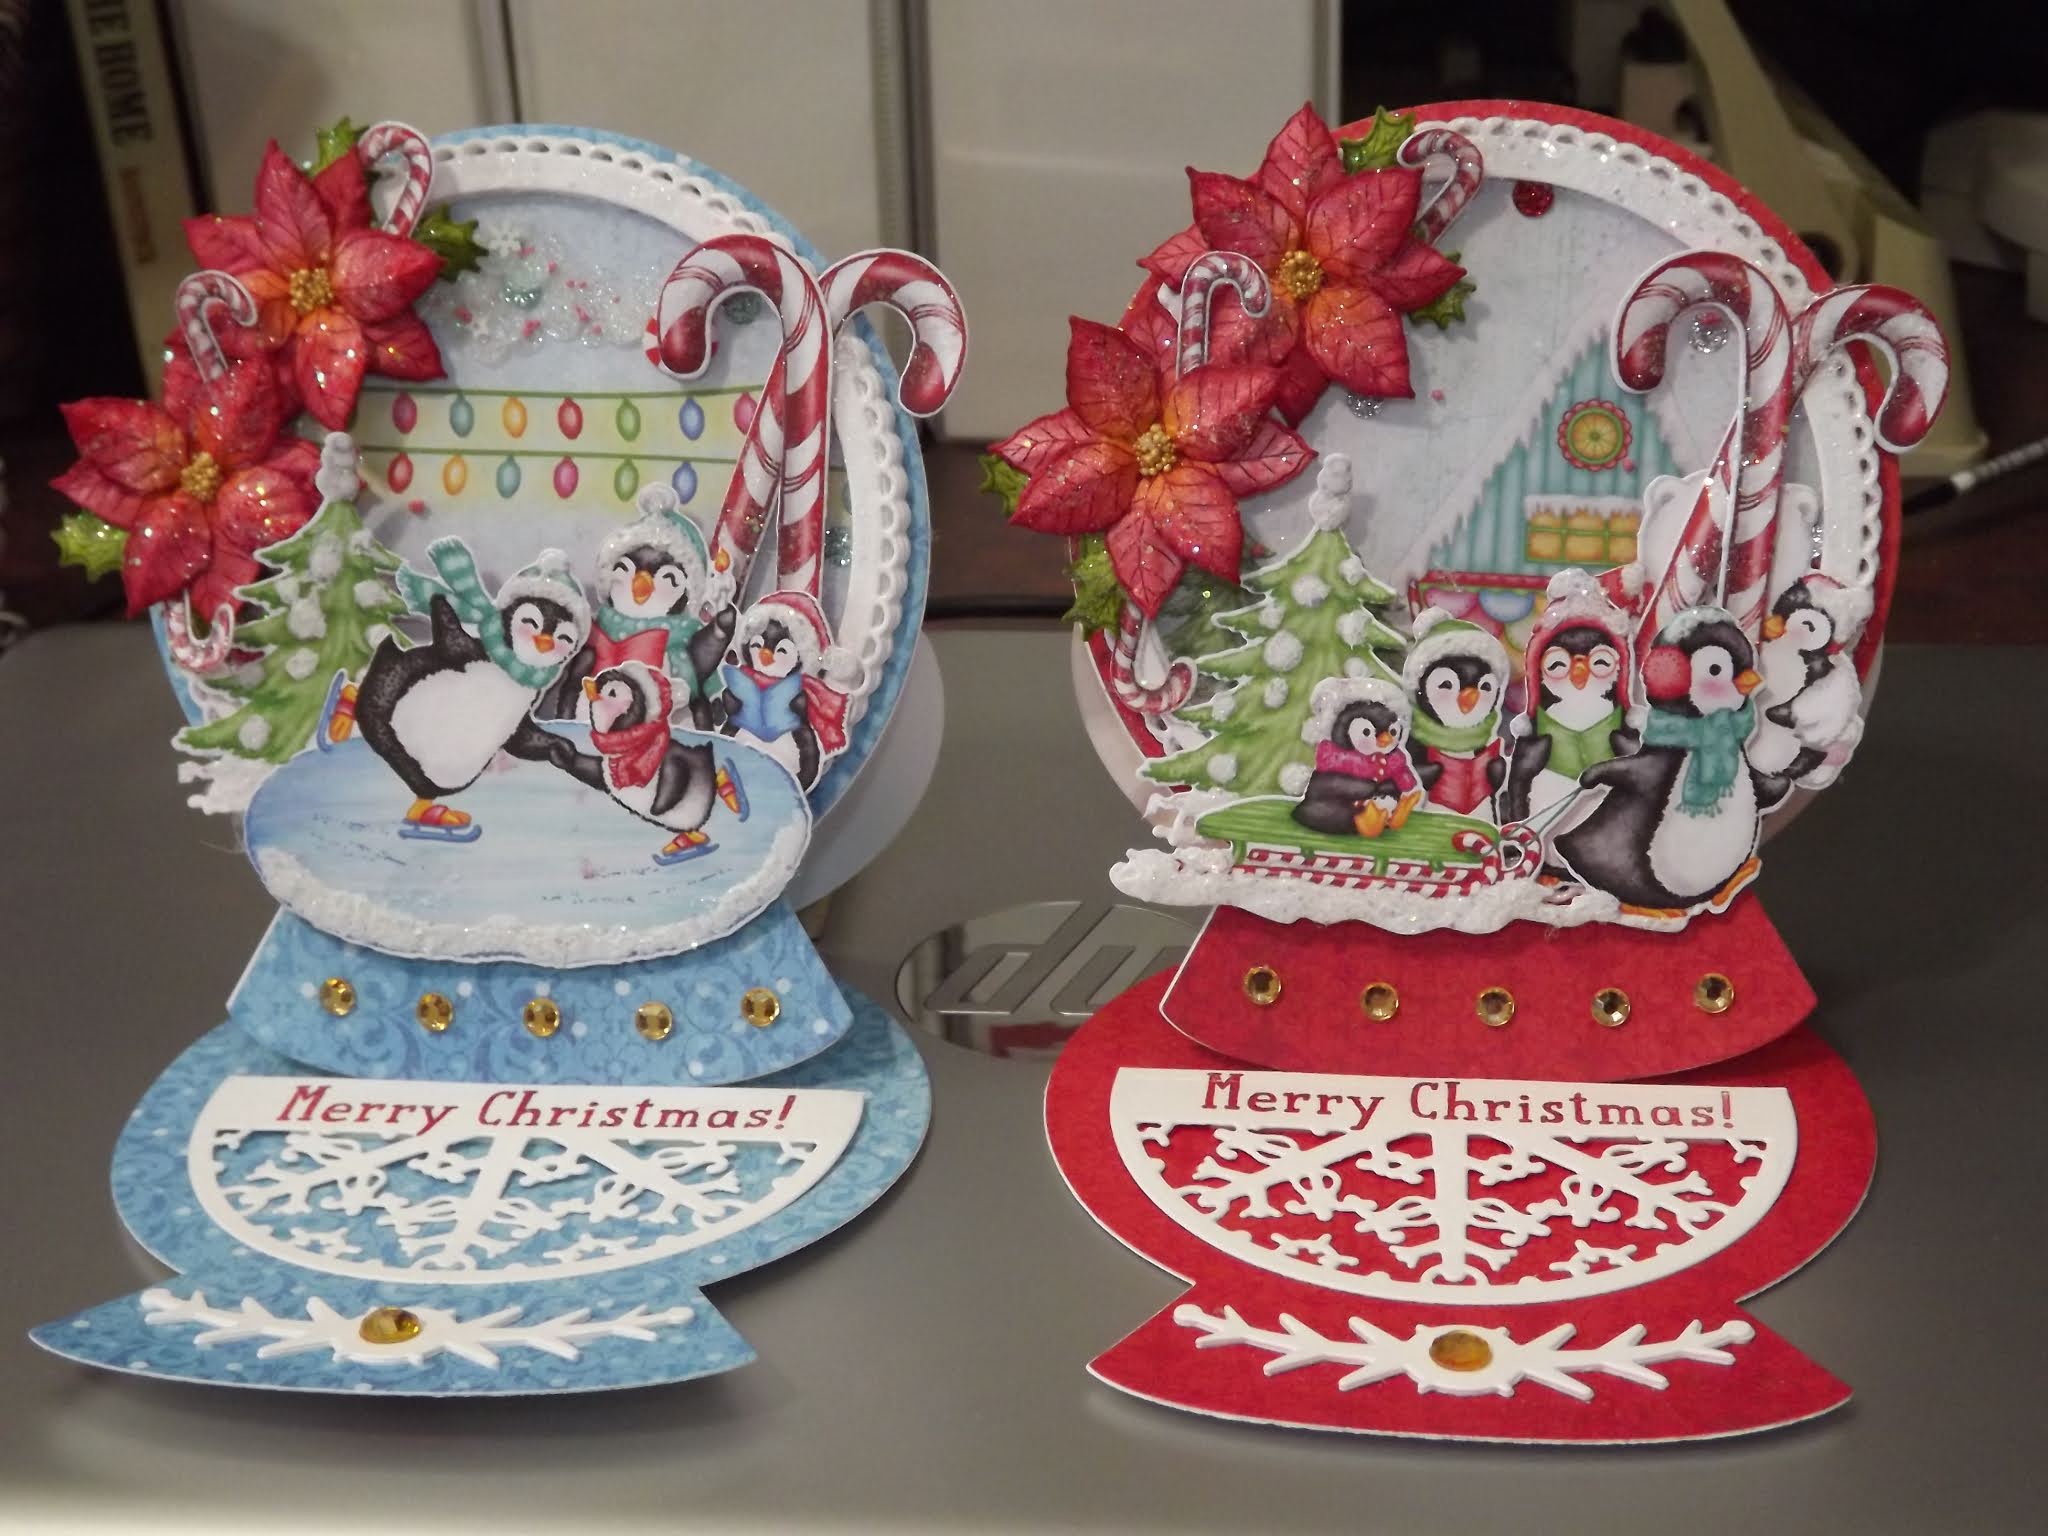
It was easy to make the easel part of the card!  The decorative dies are also part of the Snowglobe Die set.  I added some gems to dress it up.  The sentiment came from SU's stamp set Snow Place.  I made the poinsettias from another Heartfelt Collection and used SU's Real Red ink and some prills for the center.  Of course, I also used some glitter!  You can never have too much glitter.


This is how it looks from a side view.


The red card is going to be for Rachel with the penguins going sled riding.


The blue card is going to be for Sarah with the penguins skating on a pond.  I can't get enough of this die!  I want to make some ornaments with it as well.  

Everyone in the Pansy Patch wishes you and yours a very Merry Christmas!

Thanks for stopping by,

Nancy


Wednesday, December 16, 2020

Jennifer's Christmas Shaker Card

 A friend of mine turned me on to Queen and Co. stamps and dies.  They had this really cute kit called Winter Wonderland.  One of the Christmas cards was this adorable Ballerina!  I just knew I wanted to make this card for Jennifer for Christmas.  She was taking lessons until Covid hit and she loved them.  This kit included a whole bunch of items - DSP paper, stamps, dies, shaker elements and toppings!  I love how it turned out!


The CS I used was Powder Pink, Smokey Grey and Shimmery White from SU.  My little stars were from the Snow is Glistening stamp/die set from SU as well, and I used a little heart punch I had in my stash.  These cute little snowflakes were in the set as well.


My inside sentiment was a $1 stamp from Michael's.  There are several other options you can make from this set.  Check out these great cards that my friend Denise made over at her blog - Doggone Stamping With D!  

Well, we are preparing for a major snowfall.  They are forecasting up to 24"!!  I don't mind the snow as long as we don't lose power again!  I don't think we will be venturing out for awhile!  Stay safe everyone!

Thanks for stopping by,

Nancy


Saturday, December 12, 2020

Christmas Oraments

 Well, we had a busy day!  My daughter and Jennifer came up this afternoon for a visit.  Jennifer is always looking for something to do and today was no exception!  She wanted to make some Christmas ornaments for friends, cousins, etc.  Fortunately, the other day I was looking for something and came across SU's Be Merry Kit that I had purchased the other year.  Not sure why we didn't make it then but it came in handy today!  It turned out to be a really nice kit.  Of course it had all the pieces needed but it was easy to put together.  Jennifer put together the rosettes and decided the designs, and I used the glue gun.  She used some of the plain white circles to sign and date them and I glued them on the back.  Mom cut 6 inches off of her hair.  I think it made her look more grown up.  No little girl anymore!


Here is a close up of the ornaments.


Now I have to get back to finishing up the kids Christmas cards.  It was really warm and foggy here today but they are forecasting snow for the middle of the week - Oh Goody!!

Our Governor shut down the state again, so Rachel lost her job and Sarah will probably be next.  It is hard to understand why they let some places open and others they shut down.  I hope next year will be better.  All schools are back to remote until at least the first of the year and I'm sure it will be longer than that.  My daughter was told this week that she will still be working home remotely until at least the Spring.  Jennifer had her picture taken this week with both her and Santa wearing their masks - something documented for her to look back on in the years ahead.

Thanks for stopping by,

Nancy

Monday, December 7, 2020

Thinking of You Card

 I had some left over sunflowers I had made, so I decided to make a Thinking of You Card.  I'm trying to replenish my stash.  I love making these flowers.  They are from Heartfelt Creations Sunflower stamp and die set.  I also used their Decorative Circle Frames Die and the Leafy Accents stamp and Die.


 I used their Luxe Gold CS which is absolutely beautiful.  It cuts like butter with their dies.  For my sentiment, I used SU's Treat Time stamp set and their old Olive ink.  I left the inside blank for the time being so I can use this card for various occasions.  

Jennifer is back doing school remotely.  My daughter sent this cute picture of her and Daisy this morning!  These two are inseparable!  Have a great week!


Thanks for stopping by,


Nancy


Tuesday, December 1, 2020

Jennifer's Thanksgiving Card

 I just realized that I forgot to post the card I made for Jennifer for Thanksgiving.  In the past, I have used this die from Frantic Stamper - Tom Turkey.  It is so cute!

For this card, I used the Picket Fence stamp and die from Stamps by Judith and Heather, the Hip Hello die from Poppy and the Just Stitching Double Rectangle die from Lawn Fawn.  For the hello, I made several cuts and glued them together to give the sentiment some dimension.  My CS was Pumpkin Pie, Very Vanilla and Soft Suede from SU.  Of course I added some tiny googly eyes for my cute little turkey.


 For my inside sentiment, I used my $1 stamp from Michael's and some more washi tape.  We hope everyone had a good weekend.  All the Christmas lights and houses are already decorated by me.  I don't think anyone will be sad when this year ends.

Thanks for stopping by,


Nancy


Tuesday, November 24, 2020

Chocolate Pumpkin Orange

 The days are sneaking up on me and I'm not finished with some cute goodies I am making for the family, so I thought I had better post a picture sooner than later!  I saw these adorable pumpkins over at - Mixed Up Craft - and knew right away I wanted to make some.  I originally only ordered one from Amazon as they are not cheap, but eventually I found some locally that were on sale.  They came together so quick and easy!


They are from Terry's Chocolates and  come in a box.  When you open them the chocolate is in slices like an orange.  The stand is quick to put together.  I used some left over leaves I had in my stash from Heartfelt Creations.


I also had some extra Sunflowers left over from a project as well that I used for my blossoms.  Her video is very detailed. I really like so many of her projects!  I used some Nuvo drops for the centers of my flowers.  I have a few more to go!  She also mentioned that they could be made for Christmas using poinsettia flowers.  I think that would be really pretty!  I hope everyone has a blessed Thanksgiving!

 Thanks for stopping by,

Nancy

Thursday, November 19, 2020

Thanksgiving Cards

Well, looks like I'm getting my Thanksgiving cards done under the wire.  I'm still working on Jennifer's, but hope to finish it up today.  These came together pretty quick thank goodness!  I don't have any new Thanksgiving stamps so I used an old SU one - Painted Harvest along with the matching leaf punch - which I forgot I had until my friend told me it was part of the set!!  I really didn't want to fussy cut the tiny leaves!!


I used Basic Black for my card base with a layer of More Mustard and then some DSP from the Painted Autumn collection from SU.  Oldies but goodies but I really like them.


I stamped and punched two leaves for each card and tied them with some twine I had.  I love this sentiment!


For the inside, I used an old Michael's $ stamp and added some washi tape on the bottom.  I told myself I will not buy any more DSP until I use up the old stack and it seems like I have a ways to go!

Thanks for stopping by,

Nancy


Wednesday, November 11, 2020

Sunflower Birthday Card

 Today's post is a birthday card that I  made for a friend.  I used the 6"x6" Interlocking card base from Heartfelt Creations.  One thing I like about Heartfelt Creations is that it has help expand the different types of cards that I make.  I usually make a standard A2 type card, but Heartfelt Creations has so many different types of card bases and shapes that I really have enjoyed the challenge.  I also love the many types of dies that they carry.  For this card, I used their Rounded Scallop Window, Rounded Lattice Window, Rounded Sunlight Window, Tickets & Tags and the Window Hinges Dies.  

The DSP I used came from their Window Scenes Collection and the flowers from their Sunflowers Collection.  I also used a magnet for the hinge closure.  


This is a picture of the inside of the card.  It was kind of hard to photograph with the rounded edges.  I really like how this card turned out.  I loved making the sunflowers.  The birthday sentiment came from SU's Avanti Garden using Pumpkin Pie ink.  I'm trying to work on making some Thanksgiving cards.  We'll see if I make them in time for this year or next!!

Thanks for stopping by,

Nancy


Friday, November 6, 2020

Anniversary Card

Today is Joe's and my 55th Wedding Anniversary!  It really is hard to believe!  We had such a great day!  The weather was just beautiful - warm and sunny!  We went to NJ and had a nice lunch with Jeannie and Jennifer and spent the rest of the day visiting some old haunts!  We want to thank everyone for their cards, flowers and good wishes!  This is the card that I made Joe.  


I used Heartfelt Creations Royal Elegance Frames Die, Sunflower stamp and die and Sprinkled Confetti die for my numbers.  This is the first time I used this die and I loved how they all came together.  


 For the inside sentiment, I used a stamp I  found with the "Love Chapter" verse that we used at our wedding ceremony.  I was so pleased how it turned out and Joe loved it!  One of the presents I got Joe was this beautiful frame.


It came already ready to hang!  He loved it and so did I.  It has been a busy day.  Thanks for stopping by,


Nancy


Tuesday, November 3, 2020

Happy Birthday Cupcake Card

 Well, we just got back from voting and in the 16 years that we have lived here I have never seen so many people in line to vote.  I guess they anticipated an increase in numbers, as they changed our voting place from the elementary school to the Fire House.  Bigger area and a lot more parking!  Our small little community isn't small anymore!

It was a busy weekend but I managed to make this birthday card for my son-in-law.  I had quite a few cards to make this past week.  It always seem to come in bunches.  This card from made from Heartfelt Creations Sugarsplum Collection.


I always seem to have trouble making masculine cards, but knew he would like this one as he loves CUPCAKES!!  My colors were just SU's Basic Black and Whisper White.  I embossed my Whisper White CS with SU's heart folder and used Heartfelt Creations Sprinkled Confetti Cupcake stamp and die.  Each cupcake and topping has several die cuts to stack them up. I used black and white embossing powder on the cupcakes and some drops to make  my cherry shimmer.  My sentiment is from SU's Botanicals for You Stamp set.


For my inside sentiment, I used an old Michael's $ stamp and a single cupcake.  I liked how the card turned out especially with the raised cupcakes!  

We had a great time on Halloween and Jennifer's party!  Here is a pumpkin piñata that I found at Walmart's.  They had lots of fun hitting it around!


Of course, Joe always gets the kids balloons since they were babies!  They have so many nice balloons today!


She is all into turtles and fish every since I got her a turtle bracelet and she follows it online where it is in the ocean.  They made this cute snack bowl with cheddar fish and tiny chocolates.  


Here is a picture of Mom and her with her cake.


The last thing we did was dunk for apples!  What fun!


Hard to believe another year has gone bye!  These kids are getting too old!  Thanks for stopping by,

Nancy


Thursday, October 29, 2020

Jennifer's Birthday Card

 Well, I just finished wrapping Jennifer's birthday presents and decided to post her card before things get too hectic around here.  We are having her family birthday party on Saturday and then on Sunday she and a few of her friends are getting together to celebrate.  Every year since she was born, I decorate her card with the number of pumpkins according to her age.  This year I decided to make my first fold out card.  It really made spacing the pumpkins a lot easier.  


It was a little hard to photograph.  I used some old SU DSP and the Large Framelits Die for the number 7 adding three layers to  make it stand out a bit.  The pumpkins were cut using the Patterned Pumpkin Thinlets Die.


I decided to dress up these folds with some washi tape I had in my stash.


Since it is her birthday as well, I decided to use some of Heartfelt Creation's  Sugarspun Collection DSP and Dies and pop them up.  I also cut the DSP with their Elegant Border Basic Die.


Here is a picture of the other side of the card.  I was so happy with my first attempt on these cards.  I can hardly wait for Jennifer to see it!

Thanks for stopping by,

Nancy


Friday, October 23, 2020

Spider Pull Up Accordion Card

 I hope everyone is having a good week!  I have such an adorable project to show you today.  I saw this over at - Mixed Up Craft - and knew I wanted to make it for Jennifer.  She does such a great job with her instructions.  

It was really hard to photograph this cute little spider.  Here is a front view of his face.  


It is a 6" x 6" card  and fits into an envelop well.  When she opens up the envelop it will pop up and go up and down like an accordion.  In the video you can see it much better.  The nice part is that once you make the template you have it for future cards.  This will start off the celebration of Halloween and Jennifer's birthday!

Last weekend, Jennifer and her best friend had a nice get together at the ceramic store painting.   They are in different schools and due to the virus they haven't had a chance to see each other, so they really enjoyed this outing.  They were in daycare together since they were babies and it was so nice to see them together again!


 Have a great weekend and thanks for stopping by,


Nancy


Sunday, October 18, 2020

Halloween Treats

 Welcome back to my blog!  I hope you are having a good weekend.  Here in PA the weather has been great!  We had frost last night but the daytime is nice and warm still.  My friend sent me a package in the mail last week and it sure came in handy.  It was SU's Paper Pumpkin for October.  It was full of Halloween treat goodies.  Jennifer had asked me if I would make her some treats for the goodie bags for her birthday party.  I used to get the Paper Pumpkin years ago - I think they have come a long way!  It didn't take too long to put these goodies together.

I just had to punch out the treats, glue them together and then decorate them.  They had a lot of decorations including the stamps, dimensionals and even the twine.


Here is a close up of the individual treats.


Here is a picture of Jennifer and I making our Pumpkin Streusel Muffins.


They turned out so good!  Joe is ready for me to make some more!  If you are interested here is the recipe that I got from The Farmstand:

Mix -
1 stick of melted butter
1/2 cup of sugar
1/2 cup brown sugar

Add -
2 eggs
2 tbsp. vanilla
1 1/2 cups flour
1 tsp. Baking Soda
1/2 tsp. salt
2 tsp Pumpkin Pie Mix

Then add -
1/2 cup sour cream
1 cup pure pumpkin

Fill muffin pan (makes 18) 3/4 full and top with the Streusel Mix
3/4 cup flour
1 tsp cinnamon 
1/4 cup sugar
1/2 stick melted butter
1/4 cup chopped pecans

Bake at 425 degrees for 5 minutes and then lower the temperature to 375 degrees for 15 minutes.

If you want to glaze them:
1 cup powder sugar
2 tbsp. milk
1 tsp vanilla or maple syrup
 
You can tell baking season is upon us.  All Jennifer wants to do it cook and Joe wants to eat!!  Have a great week!

Thanks for stopping by,

Nancy


Friday, October 9, 2020

Halloween Eclipse Card

 I finally got to finish some more Halloween cards that have been sitting on my desk.  I usually do most of my crafting on the weekends, but last weekend Jennifer was up and we were having way too much fun!  I decided to do an eclipse card for Halloween.  There is something about this technique that just draws me in!  I ended up making a few of these 5" x 7" cards.  I made them a but larger than I normally do, so I could fit everything together.  I used a combination of old SU Halloween stamps/dies - Spooky Cat, Pick a Pumpkin and Graveyard Gate.  For my letters I used SU's Letter for You.  


For my inside sentiment, I used an oldie but goodie from Michaels and some washi tape and die cut pumpkins.


While they were up, Joe took Jennifer out on the ATV for a ride which of course she loved.  She has always ridden different motorized vehicles as she outgrew each one - her ATV when she was little, her John Deer tractor and recently her power wheel car so she is always ready to ride!  He didn't get to ride much this summer as most parks have been closed.  We are hoping they will be opened for snowmobiling.


After her ride, she wanted to paint her pumpkins with a little help from Daisy!


We then cut open the big pumpkin and roasted the pumpkin seeds.  I haven't done that in years.  They turned out really yummy!  Here is the pumpkin all cut out and lit up!  


Now you know why I didn't get any crafting done!  After this crazy year, it was so much fun to do normal things.  I gave Jennifer her Halloween box that I made her last year to take home.  It was really made for Christmas but I turned the boxes around and decorated one side for Halloween as it is also her birthday.


It is so funny looking at last year's picture, as my hair is now white!!  With all the beauty parlors closed for the virus, I couldn't get it dyed, so I decided to go back to my natural color which now is white!   It was so funny, in the beginning I would look in the mirror and ask myself who is that?  I wondered what Jennifer would say and to my surprise she said she liked it better.  

I have Jennifer's birthday card to work on as well as a few other ones.  It seems funny not to make anything for the Wellness Center this year as they still have not opened, but I will probably make something for the kids coming to Jennifer's birthday party.  We are having some great weather here but it is supposed to start raining on Sunday for a few days which means I will have some craft time.  It is hard to stay inside when the weather is so nice! Have a great weekend.

Thanks for stopping by,

Nancy


Saturday, September 26, 2020

Diagonal Halloween Flap Card

 Well, I decided that I had better start making some Halloween cards, so I started going through Pinterest to get some ideas and came across these really cute cards made by - Mixed Up Craft by Sam.  Her card was not for Halloween but you could make it for any occasion.  Even if you don't want to make this type of card check out her video.  It is sooo cute!!  She is making it with her Grandmother who is visiting her.  She was so patient and loving!  I can see me doing this with my Grandkids down the road!  I just loved it and she has some great other videos!

I made my Halloween version using some scraps I had from old SU DSP.  I made two of each DSP by just reversing the triangles.  They are 6" x 6" cards so you do need 12" x 12" CS.


Here are the other cards.


I used my Spellbinder dies for the circles and some old Michel's stamps for the sentiments with some pumpkin stickers I had left over from last year.


Here is what the inside looks like with some washi tape I added on the bottom.  It was hard to photograph but you get the idea of the folds.  All you do is score the 12" x 12" piece at 6" each way and then cut it diagonally.  I made my layers 5 1/2" x 5 1/2" and then 5" x 5".  There are some videos I saw using 8 1/2" x 11" CS but I liked these larger cards.


Here is a picture of a pink oxalis that we put in the front garden this summer.  We are going to leave it there and hope that it comes back next season.  I have seen several of these in different gardens and they all say they don't bring them inside for the winter.  Joe said he is going to put something over it to help protect it during our cold weather.  Keep your fingers crossed.  I have a smaller plant inside that I didn't plant outside so at least we will still have one as they are hard to find around here.  I got these my last visit to Lancaster, PA at a garden center.

Have a great weekend and thanks for stopping by,

Nancy

I entered this post at CardzTV Challenge #124 - Anything Goes.