Saturday, December 30, 2023

Christmas Tree Table Gifts

 I hope everyone had a wonderful Christmas.  We had everyone here for Christmas with  lots of food, presents and fun!  I saw a video using  SU's Merriest Tree Bundle on Brenda Quintana's website and knew I wanted to make some!


I made these for the table and extras for some friends.  


I made some in Garden Green CS and then the rest in Old Olive.  I used some gold glimmer paper for the star and used a lot of left over gems I had in my stash to decorate the tree. 


There are two triangle boxes that fit together filled with goodies and two trees. One plain one on the back and the decorated one on the front. I was really happy how they turned out.  

Thanks for stopping by,


Nancy


Thursday, December 21, 2023

Christmas Joy Tree Card

 Well, I managed to get another Christmas Card made.  I used another Layering stencil set from Spellbinders -  the Layered Joy Tree.  I purchased it along with the previous post's stencils.  I love how they come together.


I decided to use Real Red CS from SU for the base card this time and my layer is Very Vanilla.  The inks I used from SU were Real Red, Melon Mambo, Old Olive and Garden Green.  


I used the same Gold Wax from Simon Says that I used on the first card.  I have seen cards made using regular ink for this but I think the gold wax definitely stands out more.


For my inside sentiment, I used the stamp from SU's Merriest Tree Bundle again.  I almost forgot to make the Reindeer Food for Jennifer and now JJ.  Kids definitely make the holiday.  From everyone at the Pansy Patch we want to wish you a very Merry Christmas and a Happy New Year!

Thanks for stopping by,


Nancy


Wednesday, December 13, 2023

Christmas Card Wishes

 Is everyone ready for Christmas?  Not me!!  I'm still working on some cards!  I saw these stencils back on Christmas in July and thought they were so beautiful!  Yes, I have had them since July and just made some!!  What can I say?  Better late then never!!  LOL!!


These cards were made from Spellbinders called Layered Merry Christmas Foliage stencils.  I was so impressed how they all fit together.  My base card is Old Olive and my layered is Very Vanilla.  My inks were from SU - Old Olive, Garden Green, Real Red and Melon Mambo.


There is a shadow stencil for the greeting which I didn't use.  I thought it made the card look too crowded.  It's hard to see but I used some gold wax for the stars and gems which ready made the card!  Love how it turned out.


For my inside sentiment, I used SU's Season Like Christmas.  Love the older stamp sets.  I have another set of stencils which I hope to get done.

Thanks for stopping by,


Nancy

Tuesday, December 5, 2023

Christmas Tree Card

 I finally made my first Christmas cards of the season.  Better late than never!  


I used the Merriest Tree bundle from SU.  I got out all my green stamp pads trying to decide which color to use. 


For these cards, I used Lemon Lime Twist for the main tree color and Old Olive for the second stamping.  I layered my base card with a piece of DSP from my stash which I thought matched well.  My second layer of white I embossed with the Filigree Snowflake Folder from Simon Says.  I popped my tree up and added some gems to decorate it and cut the bow from some glimmer card stock.  I remembered that I had some of these cute tiny gold bows and used them as my tree trunks.


My inside sentiment came from the bundle as well.  I was pleased with how they turned out.  Hopefully, I will get some more cards made before the big day is here.  

Thanks for stopping by,


Nancy


Sunday, November 26, 2023

Anniversary Card

 I hope everyone had a great Thanksgiving!  I realized that I didn't post the card that I made for my husband for our anniversary a few weeks ago.  Hard to believe that it has been 58 years! 


I had something else in mind, but this is how it turned out!  I used White CS for my base card and my first layer I cut out in Gold CS.  I layered another piece of white after I embossed it with Gina K's Tapestry Folder.  I used her Curved Floral Banner Die and laid it on top of my embossing folder.  For my oval, I used my spellbinder dies and popped it up for some height.  My sentiment was from SU's So In Love stamp set. 


My inside sentiment is a stamp from Heartfelt Creations.  Joe and I used this verse in our wedding ceremony.  I loved how his card came together.

My daughter and Jennifer went to Vermont for the holiday.  We were planning on going, but we were having car trouble and didn't want to chance it.  One of the places we always took the girls was to see the prayer rock in Bristol, Vermont.  I have a picture of Jeannie when she was little just like this one of Jennifer sitting on the rock.  


I didn't get to make any Thanksgiving cards, so I guess it is on to Christmas.

Thanks for stopping by,


Nancy


Monday, November 6, 2023

Birthday Card for Jennifer

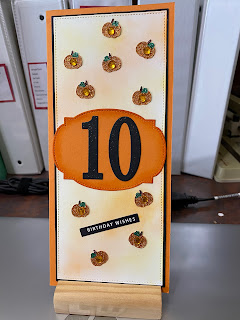
 For those who have been following me since my Granddaughter Jennifer was born, you know that I have been making her birthday cards using the number of  pumpkins with her age since she was born on Halloween.  It was easy in the beginning but is has been challenging as she is getting older.  This year she turned two numbers - 10!!!  So I decided to go to a larger size card! 


For my base card, I used Gina K's Master Layout #10 which was designed for the large slimline cards.  The card base was done in SU's Pumpkin Pie with the 1st layer in black.  I did some light stamp blending on white card stock and used SU's # of Years die for the 10 mounted on another die from the ML set.  I found these cute sticker pumpkins for her age.  


For the inside sentiment, I used SU's Happy Birthday Gorgeous Stamp Set. I was happy how the card turned out.  Here are some pictures from the family birthday party we had the weekend before Halloween.  I always make these lollipop ghosts on Halloween for the kids.  


As you can see, Jennifer is into ducks this year!!  LOL!!  She then came to our house on Halloween to celebrate and go Trick or Treat!  


She wanted her and JJ to have the same costume.  So she decided they should be Stitch!!


It was pretty cold here, but they did OK.  St least their costume was warm! I hope everyone had a  great Halloween.  Thanksgiving will be here before you know it.  Have a great week!

I entered this post at Two Old Bats Halloween Challenge.

Thanks for stopping by,


Nancy


Friday, October 27, 2023

Halloween Ghost Card

 Here is another Halloween card that came together so quick and easy.  I used the negative of the Ghost shaker card from my previous post from Pretty Pink Posh.  This is what I call getting the most for your money!!


I used SU's Highland Heather CS for my base card, and the Layered Argyle Stencils from Pretty Pink Posh again for ink blending lightly with the Highland Heather ink from SU.  I decided to pop them up with a wobble so they wiggle around!  I had some extra BOO's leftover, so I added them plus some gems.  So cute!!


For my inside sentiment, I used the same sentiment stamp set from SU - Howl-O-ween Treat.


It's so nice when you can use all the leftover pieces from the dies.  I am working on making Jennifer's birthday card which is Halloween.  Her family party is this weekend and the weather here is suppose to be nice and warm.  

Thanks for stopping by,


Nancy


Thursday, October 19, 2023

Halloween Shaker Card

 I have definitely missed getting into my craft room.  My surgery went well, so now it will just take time for my hand to recover.  Thanks for all your good wishes!  Halloween is one of my favorite times to make cards, so I started to make these adorable shaker cards that I saw Cathy Z. make.  I had to take breaks along the way but finished them up yesterday.  I just loved how they turned out!


These goodies started out using Pretty Pink Posh Layered Argyle Stencils.  There are three stencils and I used SU's Pumpkin Pie, Old Olive and Heather Highland inks to make the back ground which I layered onto Heather Highland CS for my base card.


 I used Pretty Pink Posh Ghost Shaker Die for my cute little ghost, boo sentiment and face and filled my shaker up with gems from my stash.


For my inside sentiment, I used SU's stamp set Howl-o-ween Treat.  Love how the little spider is crawling around looking for some goodies!  Unfortunately, I won't get too many cards made for Halloween but am working on a few more.

I entered this card over at Two Old Bats Halloween Challenge.


Thanks for stopping by,


Nancy


Wednesday, September 6, 2023

Cupcake Birthday Card

 If this cupcake card was real it would surely melt in today's weather.  It isn't even noon and we have set a record!  It is really nasty outside!  We celebrated JJ's 2nd birthday with the family on Saturday and it was hot then as well.  Hard to believe that our Great Grandson is already two!


I love how his card turned out!  I used Heartfelt Creations Sugar Spun Collection for everything except SU's stamp set # of Years.  The largest die created the base card, and then I used the smaller die to cut out the DSP and another one in white CS for dimension.  It's hard to see in the picture but I used their Dazzling Diamonds on the icing and bow and crystal lacquer on the cherry to make them stand out!  Their collections are so beautiful.  They will definitely be missed in the stamping world when they close down the end of the year!


 I layered the inside with some of the matching DSP and used a HB stamp from Michael's in my stash.  I forgot to take a picture so before they left I quick took one.  He loved the cherry on top!  I will be MIA for awhile as I am having carpal tunnel surgery on my right hand Friday.  I did my left hand two years ago and it made a big difference.  It has been so painful the last few months so I decided to bite the bullet.  Since I am right-handed it will be interesting but hopefully worth it.

Thanks for stopping by,


Nancy


Wednesday, August 30, 2023

Adorable Owl Card

 Did you ever think there is not enough time in the day to get what you want done?  And I'm retired!!  I had this adorable new stamp set from SU that I had chosen from Saleabration and wanted to make Jennifer a card.  Today is her first day of school in 5th Grade and her first time taking the bus home.  A lot of firsts!!  


I made my base card with Tempting Turquoise and used some silver paste on the Little Star die.  I wanted to use the Aspen Tree Die set but I don't have it.  Fortunately, my friend does so she cut some out and mailed them to me.   Thank you Denise!!  This stamp doesn't have any dies, so I had to fussy cut the cute owl and put a small wobble on it for fun!  The sentiment is from the same stamp set which I popped up.  I love how you can see the stars through the trees.  I love this die.  I may have to buy it!


For my inside sentiment, I used the Little Twinkle stamp set from SU on the same CS and added some little stars.  I love how this card came together.  Jennifer called me last night to tell me she got it in the mail and she loved it too!!

Thanks for stopping by,


Nancy

Tuesday, August 22, 2023

Bird Ballad Cards

 It has been pretty warm here the past few days, but I don't want to complain as I know what's coming!!  My post today is two more cards that I made for my daughter.  You can read all about the tin/cards in my previous post.  For these cards I didn't use the laser cut ones.


I made these cards with the stamp set Free As a Bird and used the Stitched label dies again.


This first card was made using Pool Party CS as my base card, and I layer it with some DSP from the bundle.  One thing I have to say about SU is that they have beautiful DSP.  I used one of the stamps from the set and colored it in with Pool Party blends.  The sentiment is also from the set.


I used Whisper White CS for the base on the next card and embossed the first layer with Layering Leaves folder.  I offset my two dies using Crumb Cake and Pool Party and used Pool Party Blends to color the birds.  I think these cards are one if my favorite ones.  I entered this card over at -  NBUS Challenge #53.

Thanks for stopping by,


Nancy


Tuesday, August 15, 2023

Bird Ballad Laser Cut Cards

 While trying to clean out my craft room, I found two SU boxes with these adorable tin boxes and Laser Cut cards/envelopes.  They were originally sold with the cards/envelopes plus an option for refills on tags, labels, etc. which sold out quickly.  The tins I had only contained the cards/envelopes so my thinking is that I probably got them during Saleabration.  I decided for my daughter's birthday I would make some bird cards using the Free As A Bird stamp set and DSP that belonged to the set to put in the tin.  She loves feeding her birds so we also brought her an adorable birdhouse as well. 


Each tin had 12 cards/envelopes but I ran out of time and made 10.  It ended up being more involved than I thought as there was no dies to go  with the set, so I had to fussy cut some of the birds out of the DSP.


Here is a picture of the tin. Very nice quality.


Here is a picture of the first card I made backing the laser cut with pink CS.  I used the stitched nested label dies and the sentiment from the stamp set.


I tried to make two cards with the same background color but with different birds. 


I also made wax seals in different colors so she would have them to put on the envelopes when she used them.  Spellbinders came out with these round double sided adhesive seals which makes it so easy to store and then use. I will show the rest of the cards in upcoming videos. 

Thanks for stopping by,


Nancy


Monday, August 7, 2023

Joe's Birthday Card

 We celebrated Joe's birthday over the weekend and had a good time.  We had to spend most of the day inside as it is still really hot and humid around here.  He got his first Great Grandfather card which definitely made him smile!  I always have trouble making cards for him, but I liked how this one turned out.


I decided to make a large slimline card and using Gina K's Master Layout #10 made the cutting easier.  Am I the only one that has trouble cutting the right dimensions?  I check two or three times and still may have to recut again!!  I had to go through a bunch of 12x12 DSP but finally settled on SU's Perfectly Artistic.  For the front of the card, I used SU's dies # of Year and Happy Birthday and added some gems.


For my inside sentiment, I used SU's stamp set Approaching Perfection and decorated the panel with SU's DSP from Birthday Friends and Framelit die.  It's raining here today so at least the garden will get some water.  We were late getting our tomatoes planted but we finally are getting some.

Thanks for stopping by,


Nancy

Tuesday, August 1, 2023

Tender Moments New Baby Card

 Thanks to the hot weather I have been able to find time to do some crafting.  Our new neighbors had a beautiful baby girl last week.  I decided to make them a baby card using Heartfelt Creations Tender Moments collection.  I haven't used this in awhile and I forgot how cute this collection is.  I am so disappointed that they are closing their store.  I'm glad I have a few of their collections.


I used the DSP/dies to cut out everything.  I die cut extra little animals in white CS so they would stand out better and then popped them up in the balloon basket for dimension.  I also popped up the little sign as well.  I was so happy how the card turned out!


For the inside. I die cut the adorable elephant just for fun!  


Their DSP has so many extras.  I die cut a little bear to use as a stamp!


At Christmas I got the Spellbinders wax seal set and have had a great time playing with it.  It is definitely addictive!


Right now the only seal I have says "For You" but I see more in my future!  I put a pink one on the envelope.  I made a whole bunch of them for another project I'm working on.  I also got some of the tiny circles that you adhere on them and they are all ready to go when you need one.  

I had so much fun making this card.  When we dropped it off with a little gift we got to see the baby who is so cute!  It is so nice to have a little one growing up in the neighborhood again!

Thanks for stopping by,


Nancy


Monday, July 24, 2023

Birthday Card

 Here is another birthday card I made.  This one is for my daughter.  Gina K did this technique a few weeks ago. and  I thought it was so unique and different.  For those who want to try it, here is the VIDEO.  


It is made with her 3D Diamond Cover plate.  It can be made with any cover plate, but since I didn't' have any I ordered the one she used.  I thought it was pretty neat.  First you cut out two die cuts and adhere them together.  Then you take a silhouette stamp set and stamp it on two different pieces of paper in the exact same position.  Using a stamp positioner makes it easy to accomplish.  The closest one I had was my Springtime stamp and die I had purchased from Local King Rubber at a craft show years ago.  It is a pansy plant in a saucer.  Then you die cut one with the 3D die and place it exactly over the other imagine.  You trim off the edges and then I mounted my on black CS and used SU's Highland Heather for my base CS.  I used one of Gina K's paper sentiments that I had in my stash.  All I had to do was cut it out.


For my inside, I used the ladybug stamp from the set.  I thought they were so cute.  I still have some other birthday cards to make and I have been busy making some other projects, so with this hot weather my craft room has been getting a workout!

Thanks for stopping by,


Nancy