Thursday, April 24, 2014

Flower Shop Birthday Card

We hope everyone had a wonderful Easter weekend.  Things have been pretty hectic around and I have a lot of birthdays coming up and have been busy making some cards.  I saw this card on Pinterest and just fell in love with it.  I loved it because of its soft colors and of course the pansies.


I decided it was the perfect card for my daughter's birthday which is next week right after Rachel's.  She and I both love flowers - especially pansies.  We're always buying each other something pansies related.

Recipe:

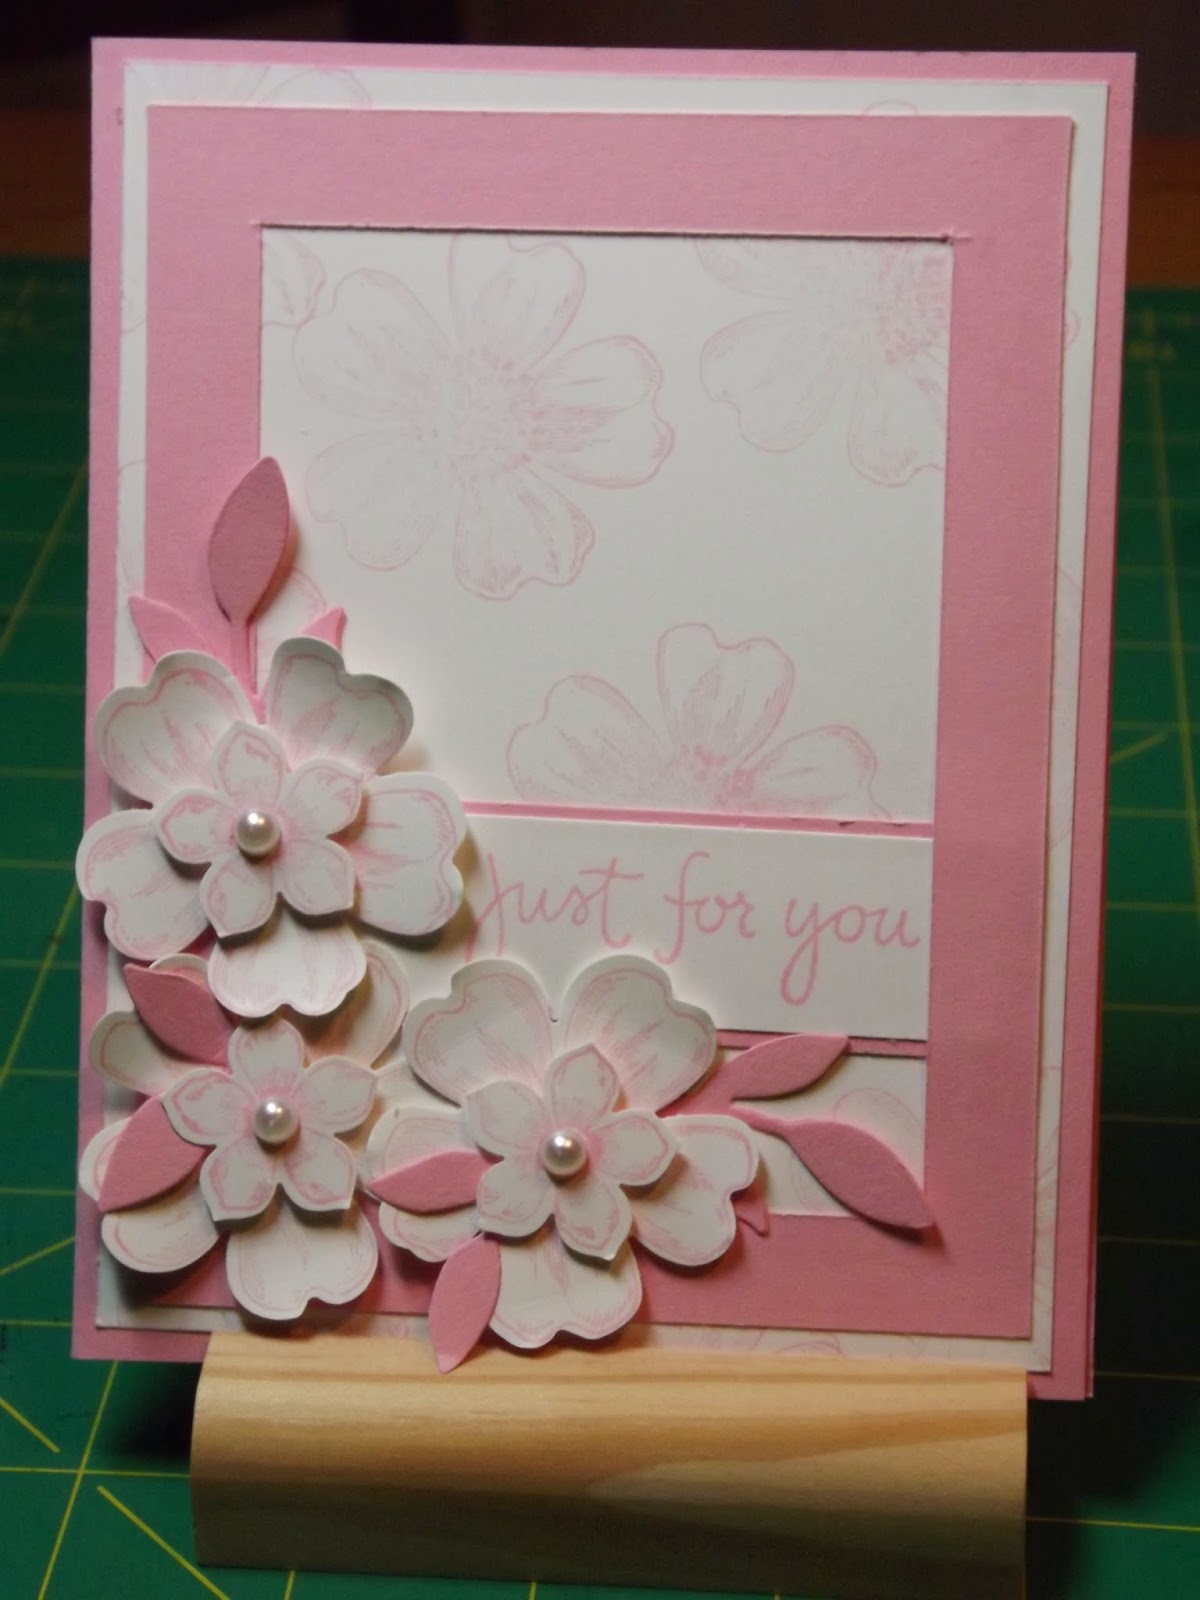
Stamps - Flower Shop, Petite Petals - SU, Birthday Sentiment - Michael's
Ink - Pretty & Pink - SU
Paper - Pretty & Pink, Whisper White - SU
Accessories - Pansy & Petite Petals Punches, leaf die - SU
Embellishments - Pearls - SU

The card is A2 sized in Pretty & Pink with a layer of Whisper White 4" x 5 1/4".  The original card used a background stamp on this layer, but since I didn't have one I decided to randomly stamp my pansy stamp and make my own and then I adhered it on the base card.  Then I cut a layer of 4 3/4" x 5" in Pretty & Pink.  Using my cutting board, I cut out a square leaving a 1/2" frame.  I was really surprised how well this worked.  Sometimes I really do surprise myself!  Before adhering it to my Whisper White layer I cut out a piece of Pretty & Pink 1" wide and glued on a piece of 3/4" Whisper White for my sentiment.  The original card had a birthday sentiment but I didn't have one that fit that size, so I used a stamp "Just for you" that I had purchased years ago from Michael's $1 bin.  Love that bin!!!  I glued it on to the edges where I wanted it and then glued the entire frame on the card.  I then punched out 3 pansies and 3 petite petals to make my flowers.  I popped up my petals with dimensionals and placed my pearls in the center.  I staggered these on the bottom left corner and put some leaves in between them.


To finish it off, I stamped pansies on the inside sheet with my sentiment and I was done.  Did I say I really liked this card?   I really liked how this card turned out.!  Well, hard to believe the weekend is almost here - YEA!!  Rachel's birthday is next week as well, but I won' show you her card until after her party - she's always sneaking a look!  Rachel - you will have to wait!!

Thanks for stopping by,
Nancy, Rachel & Sarah

I submitted this post to SU-Only Challenges #95 featuring Flowers. and CardzTv Card Challenge #6 - Create a card for Spring.


Saturday, April 19, 2014

Happy Easter!!!

Here's hoping everyone is enjoying this beautiful Easter weekend!  At last the sun - and no snow in sight!!!  We're all heading out to Jennifer's house to color eggs this afternoon.  Here's a picture of our Easter Egg Tree I mentioned the other day.


My youngest daughter won this tree ( AKA Money Tree) when she was in grammar school, and I have used it every year since for our Easter Tree.  When my daughters were young, we all use to go to ceramics and all the goodies under the tree one of us made for Easter at some time.  I had made each of them their own baskets and they still look forward to seeing them every year - good memories!!

Thanks for stopping by and visiting with us.  Everyone in the Pansy Patch wishes you and your families a Blessed Easter weekend!

Nancy                 Rachel                   Sarah


Wednesday, April 16, 2014

Carrot Treat Bag & Jennifer's Treat Bag

I thought I was finished with goodies for Easter, but I couldn't resist making these adorable carrot treat bags.  I saw them made by Sue Stampfield and just fell in love with them.  She has a great video explaining how to make them.


They came together so quick and easy.  I actually had the Floral framelits to make the carrots.  I used another embossing folder as I didn't have the one she used.  I love how they turned out!  Inside my carrots I put a little peep instead of a bunny, as I guess all the bunnies around us have hopped away, but I'm sure the kids won't mind!  


Here's a close up of the treat bags.  The other Easter project I was working on was a little treat bag for Jennifer.  I saw this adorable bag on NanaCompany.  She just became a contributor for DIY and this was her first project for them.  I always check out her blog, as I enjoy seeing the projects she makes.  I have not embroidered in many moons but decided to give it a try and was pleasantly surprised how easy this came together.  


I used my light box to trace my pattern on my material and made my own binding with some left over material Sarah had from making her doll a dress last summer.  It had some cute yellow duckies on it.  I used a ribbon to tie off my bag and tacked it down on the back so it wouldn't fall off.


Here's the little basket I got for her.  I saw this on sale at Hobby Lobby and got it for $2.00!!  I put a little toy in the bag for her and we're all ready for Easter!  I must have jinked us yesterday as we woke up to snow - only a covering but still snow!!!  Where is Spring????  Hopefully, it is on it's way!

Thanks for stopping bye,
Nancy, Rachel & Sarah


Tuesday, April 15, 2014

Easter Egg Card

I needed one more Easter card, so I asked my friend Denise to come up with her SU goodies so we could create this card.  There are alot of how-to videos out there on creating this type of card, but we liked how Stamp Your Art Out did hers.


This is how it looks when you open up the envelope, but when you turn the top half of the card look what greets you!


Isn't that cute!  Only a face a Mother could love!  And of course it has my Pansy flower on it which makes it even cuter!  I think my daughter and the girls will love it! Well, believe it or not I just checked outside and  freezing rain is coming down with the temperature dropping.  I'm glad I brought my pot of pansies inside.  Hopefully, snow it not on the menu!  Hope everyone is having a good week!

Thanks for stopping bye,
Nancy Rachel & Sarah

I entered this card into Cardz TV Challenge #5 - Easter Card


Sunday, April 13, 2014

More Bunnies!!!

I decided that I needed some more goodies for the Wellness Center.  I saw these cute "bunnies" on Stamping to Share and decided to make some.  She did a quick video on how to make them.  I love her videos - she does a really nice job!


They came together pretty quick.  I did them assembly style and only altered the size of the ears.  She used the larger ovals and I used the smaller ones.


Here's a close up picture.  The other thing I did was use glue to adhere my ears so I wouldn't use up all my glue dots!  We had a wonderful weekend here - the weather was so beautiful and we loved every minute of it!  Hopefully, we have seen the last of snow for awhile!!  I'm working on another little treat for Easter - too many goodies out there this year.  It's been hard to make up my mind what I wanted to make.  Hope you are enjoying some good weather as well.

Thanks for stopping bye,
Nancy, Rachel & Sarah

Friday, April 11, 2014

Easter Bunny Card

With all my craft time spent making goodies for the Wellness Center and Easter closing in next week, I decided I had better make some cards to send out.  I saw this cute bunny card on Pinterest and decided to make some.


Recipe:

Stamps - Tiny Wishes - SU, sentiment from Michaels
Paper - Pretty and Pink, Old Olive, Chocolate Brown - SU
Accessories - Fringe Scissors, Swiss Dot Embossing Folder, Punches

I made this an A2 card and embossed my layer of 4" x 5 1/4" with my embossing folder.  I cut a piece of Old Olive 1" x 4" and used my fringe scissors to cut it so it looks like grass for the bunny to sit on.  I adhered it to my layer and then using my 1 3/4" punch for the body, the 1 1/4" punch for the head and the small oval for the ears created my bunny.  I used my white craft ink and lightly sponged the edges of my bunny to give it some dimension.  I used my dimensionals to pop up my bunny on the layer and slipped my holiday greeting underneath.  I tried several types of glue to attach my little cotton tail but finally found that my glossy accent worked the best.  I put a punch on top it for awhile to make sure that it stayed put.  These bunnies are frisky little fellows!!


I used this cute stamp I had found in Michael's $1 bin last year for the inside of the card.  I thought it made my card complete.  Hope everyone is enjoying their Easter preparations.  The girls don't have much time off due to all the snow days they have to make up, but they still have Good Friday off which they are looking forward to.

Thanks for stopping bye,
Nancy, Rachel & Sarah

Tuesday, April 8, 2014

Bunnies, Bunnies Everywhere!!

Here is one of the trays of Easter goodies that I just put together for my daughter to take to the Wellness Center.  This is a picture of all the little eyes that have been watching me work that I told you about!!!


Aren't they cute!! The best thing is that the SVG cut was free!  My friend Denise cut them out for me on her Silhouette.  All you have to do is put a nugget bar in between the head and tail.  I used my SU stamp set "It's A Wrap Holiday" to put on the nuggets and used the Peachy Keen stamp set PK-440 Cute & Cuddly Face Assortment for the faces.  I used my SU Pink Pirouttte marker to color in the nose, mouth and ears and then I adhered the head and tail with glue dots and they were ready to hop!!


Here's a bunch of the bunnies all ready to go to the Wellness Center.  The best part of the SVG file is that there is also cutouts for a cat, dog and frog!  If I was going to make just a few, I would have added a little puff ball for the tail instead of the cutout.  I think they are sooooo cute!

Hope everyone is having a good week!

Thanks for stopping bye,
Nancy, Rachel & Sarah

I entered these Bunnies in Cardz TV 3D Challenge #5 Easter

Friday, April 4, 2014

Hello Spring Easter Card

Well, it has been a busy week around here.  We're trying to get ready for Easter with lots to do.  I managed to create a card though and wanted to share it with you.


This card was pretty clean and simple, but I really liked how it turned out.

Recipe:

Stamps - Hello Spring from My Creative Time
Ink - Black Stazon, SU Markers
Paper - Wisteria Wonder, Daffodil Delight and Whisper White - SU
Accessories - Spellbinders Oval Dies, Corner Rounder Punch, Basket Weave Embossing Folder
Embellishments - Twine

This is an A2 size card in Wisteria Wonder with a layer of Daffodil Delight, which I embossed and used my corner rounder punch on.  After I stamped and colored in my stamp, I cut it out with my dies and tied some twine around it. Then I popped it up with some dimensionals on my base card, and I was done.  I love this stamp set.  It has a bunch of other stamps in it and some dies that match.

I have been busy making some Easter treats and will post them next week.  Just a little hint - I have had a lot of little eyes watching me work!!  I can hardly wait to show you!  It was so nice here yesterday and then today it was very cold and rainy.  They say the weekend will be nice so we will see.  Have a great weekend whatever your weather it!

Thanks for stopping bye,
Nancy, Rachel & Sarah